当該記事では、Hyper-Vで構築したCentOS7環境にxrdp経由でアクセスすることで、ホストOSであるWindows環境からCentOS環境へファイルをコピペする方法をご紹介致します。
「続:Hyper-VでCentOS7環境を作る」でHyper-Vで構築したCentOS7環境にxrdpを使ってアクセスすることでファイル共有できるようにする方法をご紹介致しましたが、xrdp 0.9.11では不具合の為接続できませんでした。
2020年4月19日現在ではxrdpのバージョンは0.9.13となっており、hvsockを利用したアクセスに関する不具合は解消しております。
上記の記事で記載した設定はxrdp 0.9.10での設定方法になりますので、そのまま残し、新しい設定方法は本記事でご紹介致します。
xrdp, xorgxrdpのインストール
前回の記事のおさらいです。CentOS7のインストール手順は省きます。Hyper-Vの使い勝手を良くするためにファイル共有と解像度共有をリモートデスクトップ接続を使って仮想マシン接続することで実現するため、CentOS7にxrdpとxorgxrdpをインストールします。
基本的にrootユーザでの作業になります。su - root でrootユーザになってから作業します。
・yumの更新と必要な開発ツールのインストール
# yum -y install finger cmake patch gcc make autoconf libtool automake pkgconfig openssl-devel gettext file pam-devel libX11-devel libXfixes-devel libjpeg-devel flex bison gcc-c++ libxslt perl-libxml-perl xorg-x11-font-utils xmlto-tex git libXrandr-devel nasm xorg-x11-server-devel xorg-x11-server-Xorg libXfont2-devel
・gitからxrdp, xorgxrdp のダウンロード
# cd
# mkdir git
# cd git
# mkdir neutrinolabs
# cd neutrinolabs
# git clone --recursive https://github.com/neutrinolabs/xrdp.git
# git clone https://github.com/neutrinolabs/xorgxrdp.git
・xrdpのインストール
※ vsock, fuse, ipv6以外はオプションで。
# cd xrdp
# ./bootstrap
# ./configure --enable-vsock --enable-fuse --enable-ipv6 --enable-jpeg --enable-pixman --enable-pam
# make
# make install
・xorgxrdpのインストール
# cd xorgxrdp
# ./bootstrap
# ./configure XRDP_CFLAGS=-I~/git/neutrino/xrdp/common XRDP_LIBS=" "
# make
# make install
xrdp, xorgxrdpの設定、およびその他の関連する設定作業
・xrdp.iniの設定
xrdp.iniを編集します。【before】のパラメータが変更対象です。【after】以下のように修正します。
xrdp 0.9.10との違いはportにvsockを指定し、use_vsockパラメータはfalseのままにすること、max_bppも32のままで問題無いことです。
# cd /etc/xrdp
# vi xrdp.ini
【before】
port=3389
security_layer=negotiate
crypt_level=high
bitmap_compression=true
【after】
port=vsock://-1:3389
security_layer=rdp
crypt_level=none
bitmap_compression=false
・sesman.iniの設定
sesman.iniを編集します。【before】のパラメータが変更対象です。【after】以下のように修正します。
# vi sesman.ini
【before】
X11DisplayOffset=10
FuseMountName=thinclient_drives
【after】
X11DisplayOffset=0
FuseMountName=shared_drives
・Xwrapper.configファイルの作成
Xwrapper.configファイルを作成します。
# echo "allowed_users=anybody" > /etc/X11/Xwrapper.config
・hv_sock.confファイルの作成
hv_sock.confファイルを作成します。
# echo "hv_sock" > /etc/modules-load.d/hv_sock.conf
・xrdp session カラープロファイルの作成
# vi /etc/polkit-1/localauthority/50-local.d/45-allow-colord.pkla
[Allow Colord all Users]
Identity=unix-user:*
Action=org.freedesktop.color-manager.create-device;org.freedesktop.color-manager.create-profile;org.freedesktop.color-manager.delete-device;org.freedesktop.color-manager.delete-profile;org.freedesktop.color-manager.modify-device;org.freedesktop.color-manager.modify-profile
ResultAny=no
ResultInactive=no
ResultActive=yes
・日本語キーボードの設定
# cd /etc/xrdp
# curl https://www.mail-archive.com/xrdp-devel@lists.sourceforge.net/msg00263/km-e0010411.ini > km-e0010411.ini
# cp km-e0010411.ini /etc/xrdp/km-0411.ini
# cp km-e0010411.ini /etc/xrdp/km-e0200411.ini
# cp km-e0010411.ini /etc/xrdp/km-e0210411.ini
・ファイヤーウォールの設定
# firewall-cmd --permanent --add-port=3389/tcp
# firewall-cmd --permanent --add-port=3389/udp
# firewall-cmd --reload
・SELinuxの設定
※ SELinuxはひとまずpermissiveにして、エラー情報だけ捕捉するようにします。
SELinux Trouble shooterで表示されるxrdpに関するエラーを解消し、そのあとenforcingに戻すと良いと思います。
# vi /etc/selinux/config
【before】
SELINUX=enforcing
【after】
SELINUX=permissive
・サービスの自動起動設定
# systemctl enable xrdp
# systemctl enable xrdp-sesman
# systemctl start xrdp-sesman
# systemctl start xrdp
あとはCentOSを一度シャットダウンして、PowerShellから以下のコマンドを実行し、仮想マシンの再起動と接続をするのみです。
【Power Shell】
Set-VM -VMName "仮想マシンの名称" -EnhancedSessionTransportType HvSocket
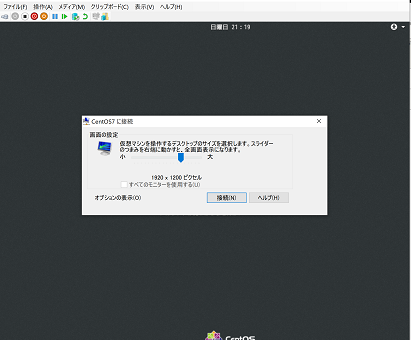
Hyper-VからのCentOS7起動
Hyper-VマネージャーからCentOSへ接続すると、CentOSの起動とともに解像度や共有オプションの画面が表示されます。
これにより解像度が低解像度に固定されていた問題が解消されます。
接続ボタンをクリックするとxrdpのログインフォームが開きます。

Xorgを選択して、CentOSのユーザとパスワードを指定してログインします。
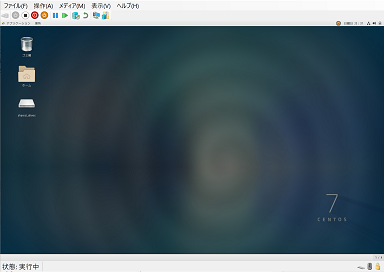
この状態でホストOSからファイルをコピーして、CentOSのデスクトップにファイルを貼り付けることができます。
以上です。